Extending papermill through entry points
What are entry points?
The python packaging documentation describes entry points as:
Entry points are a mechanism for an installed distribution to advertise components it provides to be discovered and used by other code. For example:
Distributions can specify console_scripts entry points, each referring to a function. When pip (or another console_scripts aware installer) installs the distribution, it will create a command-line wrapper for each entry point.
Applications can use entry points to load plugins; e.g. Pygments (a syntax highlighting tool) can use additional lexers and styles from separately installed packages. For more about this, see Creating and discovering plugins.
When running, papermill looks for entry points that implement input / output (I/O) handlers, and execution handlers.
Developing new I/O handlers
Virtually the first thing that happens when papermill is used is that the input notebook is read in. This is managed by I/O handlers, which allow papermill to access not just the local filesystem, but also remote services such as Amazon S3. The same goes for writing the executed notebook to a file system: I/O handlers allow papermill to write files to S3 or otherwise.
Creating a new handler
Writing your own I/O handler requires writing a class that has four methods. All I/O handlers should implement the following class methods:
CustomIO.read(file_path), returning the file contentCustomIO.write(file_content, file_path), returning nothingCustomIO.pretty_path(path), returning a prettified pathCustomIO.listdir(path), returning a list of paths.
Note
If you don’t want to support things such as read because your I/O
handler is only intended for writing (such as a publish-only platform), then
you should implement the method but raise an exception when it is used.
Ensuring your handler is found by papermill
Once you have developed a new handler, you need to declare papermill entry
points in your pyproject.toml file.
This is done by including the [project.entry-points."papermill.io"] section
in your pyproject.toml file:
[project.entry-points."papermill.io"]
"sftp://" = "papermill_sftp:SFTPHandler"
This indicates to papermill that when a file path begins with sftp://, it
should use the class papermill_sftp.SFTPHandler to handle reading or writing
to that path. Anything before the equal sign is the path prefix, and everything
after it is the class to be used, including where it is imported from.
Traditionally, entry points for papermill I/O handlers look like URL prefixes.
For example, the Amazon Web Services S3 handler is registered under s3://,
and so is used whenever a path begins with s3://.
Example: sftp I/O handler
As an example, let’s go through how we would create an I/O handler that reads from an sftp server and writes back to it, so we could do the following:
papermill sftp://my_ftp_server.co.uk/input.ipynb sftp://my_ftp_server.co.uk/output.ipynb
Our project structure will look like this:
papermill_sftp
    |- pyproject.toml
    |- src
        |- papermill_sftp
            |- __init__.py
We can define the I/O handler in src/papermill_sftp/__init__.py. To do so,
we have to create a class that does the relevant actions.
For reading, we will download the file to a temporary path and read it in from there. For writing, we will write to a temporary path and upload it from there. Prettifying the path doesn’t need to change the path, and we are not going to implement a listdir option for now.
import os
import pysftp

sftp_username = os.getenv('SFTP_USERNAME')
sftp_password = os.getenv('SFTP_PASSWORD')

class SFTPHandler:

    @classmethod
    def read(cls, path):
        """
        Read a notebook from an SFTP server.
        """
        parsed_url = urllib.parse.urlparse(path)
        with tempfile.TemporaryDirectory() as tmpdir:
            tmp_file = pathlib.Path(tmpdir) / pathlib.Path(parsed_url.path).name
            with pysftp.Connection(
                parsed_url.hostname,
                username=sftp_username,
                password=sftp_password,
                port=(parsed_url.port or 22),
                cnopts=cnopts,
            ) as sftp:
                sftp.get(parsed_url.path, str(tmp_file))
            return tmp_file.read_text()

    @classmethod
    def write(cls, file_content, path):
        """
        Write a notebook to an SFTP server.
        """
        parsed_url = urllib.parse.urlparse(path)
        with tempfile.TemporaryDirectory() as tmpdir:
            tmp_file = pathlib.Path(tmpdir) / "output.ipynb"
            tmp_file.write_text(file_content)
            with pysftp.Connection(
                parsed_url.hostname,
                username=sftp_username,
                password=sftp_password,
                port=(parsed_url.port or 22),
                cnopts=cnopts,
            ) as sftp:
                sftp.put(str(tmp_file), parsed_url.path)

    @classmethod
    def pretty_path(cls, path):
        return path

    @classmethod
    def listdir(cls, path):
        raise NotImplementedError
The pyproject.toml file contains the following code:
[build-system]
requires = ["setuptools>=61.0", "wheel"]
build-backend = "setuptools.build_meta"

[project]
name = "papermill_sftp"
version = "0.1"
description = "An SFTP I/O handler for papermill."
authors = [
    {name = "My Name", email = "my.email@gmail.com"}
]
dependencies = ["pysftp"]

[project.urls]
Repository = "https://github.com/my_username/papermill_sftp.git"

[project.entry-points."papermill.io"]
"sftp://" = "papermill_sftp:SFTPHandler"

[tool.setuptools]
packages = ["papermill_sftp"]
package-dir = {"" = "src"}
When executing, papermill will check if the input or output path begin with
sftp://, and if so, use the SFTPHandler from the papermill_sftp project.
Developing a new engine
A papermill engine is a python object that can run, or execute, a notebook. The default implementation in papermill for example takes in a notebook object, and runs it locally on your machine.
By writing a custom engine, you could allow execution to be handled remotely, or you could apply post-processing to the executed notebook. In the next section, you will see a demonstration.
Creating a new engine
Papermill engines need to inherit from the papermill.engines.Engine class.
In order to be used, the new class needs to implement the class method
execute_managed_notebook. The call signature should match that of the parent
class:
class CustomEngine(papermill.engines.Engine):

    @classmethod
    def execute_managed_notebook(cls, nb_man, kernel_name, **kwargs):
        pass
nb_man is a nbformat.NotebookNode object, and kernel_name is a string. Your
custom class then needs to implement the execution of the notebook. For example,
you could insert code that executes the notebook remotely on a server, or
executes the notebook many times to simulate different conditions.
As an example, the following project implements a custom engine that adds the time it took to execute each cell as additional output after every code cell.
The project structure is:
papermill_timing
    |- pyproject.toml
    |- src
        |- papermill_timing
            |- __init__.py
The file src/papermill_timing/__init__.py will implement the engine. Since
papermill already stores information about execution timing in the metadata,
we can leverage the default engine. We will also need to use the nbformat
library to create a notebook node object.
from datetime import datetime
from papermill.engines import NBClientEngine
from nbformat.v4 import new_output

class CustomEngine(NBClientEngine):

    @classmethod
    def execute_managed_notebook(cls, nb_man, kernel_name, **kwargs):

        # call the papermill execution engine:
        super().execute_managed_notebook(nb_man, kernel_name, **kwargs)

        for cell in nb_man.nb.cells:

            if cell.cell_type == "code" and cell.execution_count is not None:
                start = datetime.fromisoformat(cell.metadata.papermill.start_time)
                end = datetime.fromisoformat(cell.metadata.papermill.end_time)
                output_message = f"Execution took {(end - start).total_seconds():.3f} seconds"
                output_node = new_output("display_data", data={"text/plain": [output_message]})
                cell.outputs = [output_node] + cell.outputs
Once this is in place, we need to add our engine as an entry point to our
pyproject.toml file - for this, see the following section.
Ensuring your engine is found by papermill
Custom engines can be specified as entry points, under the
papermill.engine prefix. The entry point needs to reference the class that
we have just implemented. For example, if you write an engine called
TimingEngine in a package called papermill_timing, then in the pyproject.toml
file, you should specify:
[build-system]
requires = ["setuptools>=61.0", "wheel"]
build-backend = "setuptools.build_meta"

[project]
name = "papermill_timing"
version = "0.1"
description = "A papermill engine that logs additional timing information about code."
authors = [
    {name = "My Name", email = "my.email@gmail.com"}
]
dependencies = ["papermill", "nbformat"]

[project.urls]
Repository = "https://github.com/my_username/papermill_timing.git"

[project.entry-points."papermill.engine"]
timer_engine = "papermill_timing:CustomEngine"

[tool.setuptools]
packages = ["papermill_timing"]
package-dir = {"" = "src"}
This allows users to specify the engine from papermill_timing by passing the
command line argument --engine timer_engine.
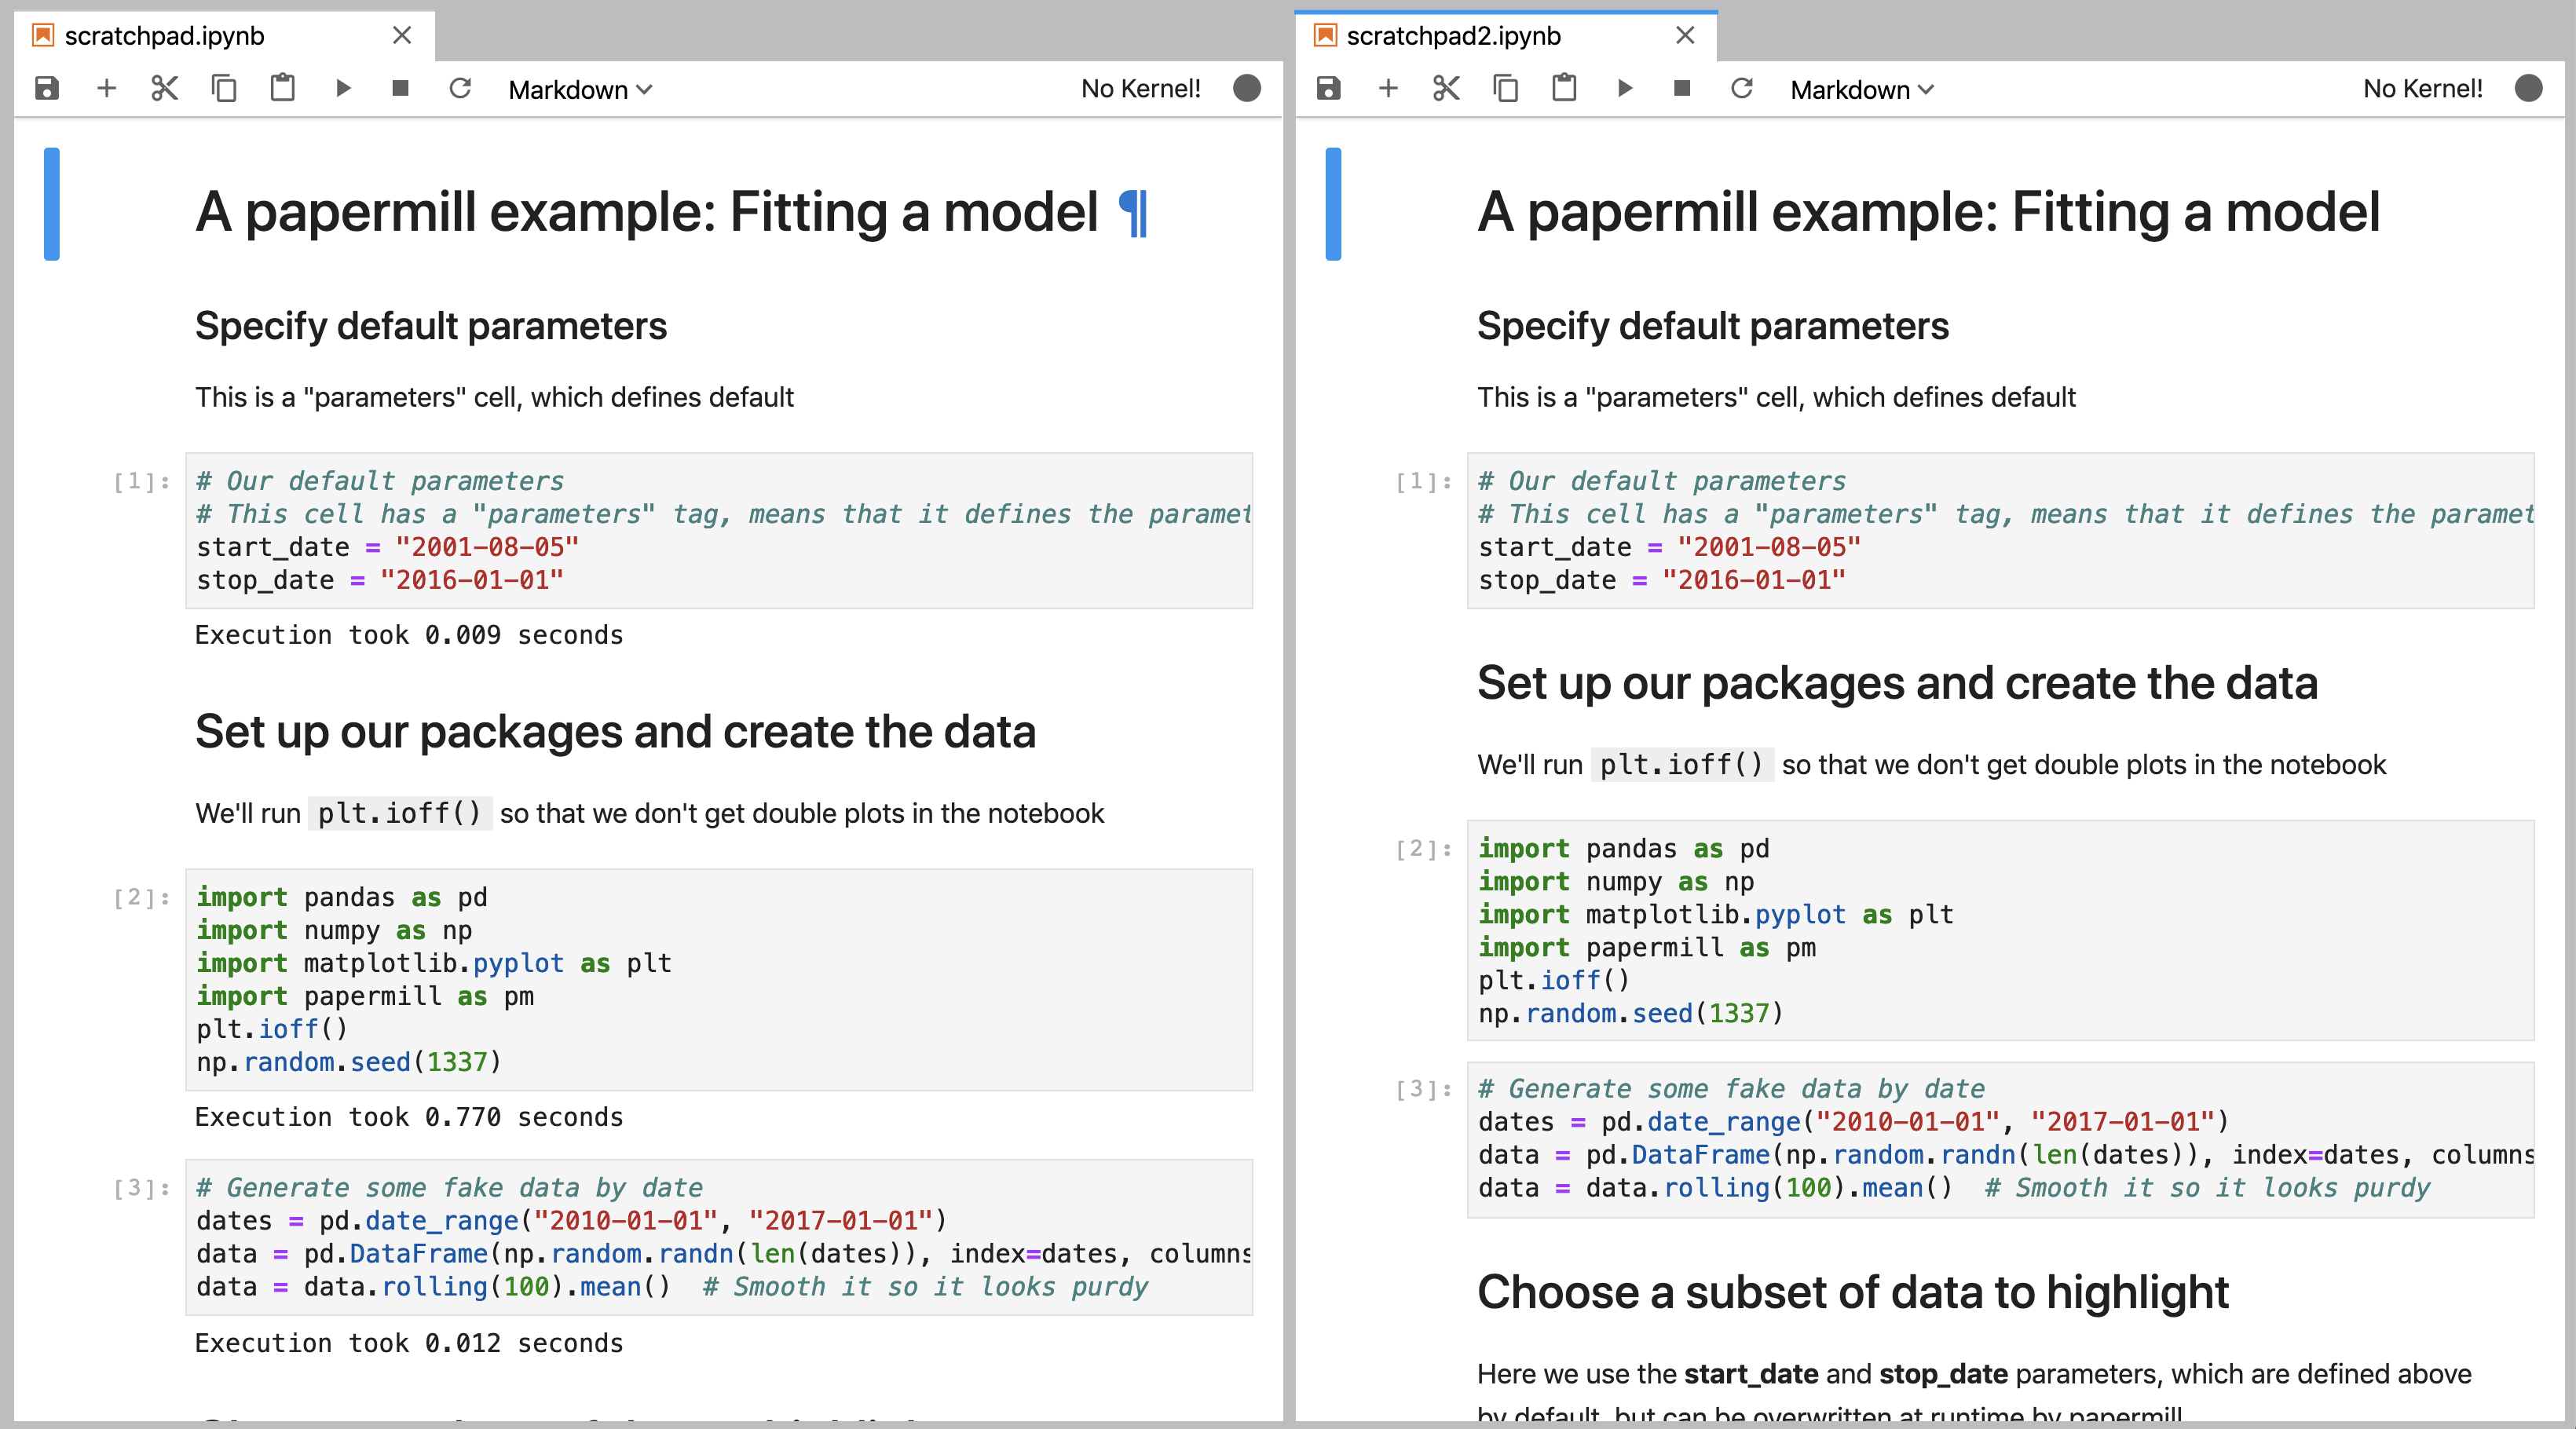
In the image below, the notebook on the left was executed with the new custom engine, while the one on the left was executed with the standard papermill engine. As you can see, this adds our “injected” output to each code cell